
|
1/70 Saturn 1B SM decal puzzle
1 Attachment(s)
Many years ago, when I started my resurrection of a badly-built Estes Saturn 1B, I purchased a nice decal for the SM from Excalibur.
Now I'm actually finishing the model (which I flew "naked" a few years back). Not trying to do a great job, TBH, just making it presentable for a July 20th launch. I delayed gluing on the four service module attitude rockets, figuring I could glue them on after the decal, scratching away enough of the film to make a paintable service. I measure down the specified .72" on the decal and found . . . nothing that would suggest a "pad" for the thrusters. But a little further down were little yellow rectangles. Moreover, there was not way I could fit the entire decal on the model's SM. I know I wasn't very careful with this model (I started it in 1974!) but I couldn't imagine being about a half-inch off. Then I noticed a fine dotted line a bit down from the "top" of the decal. I got out my "digital" ruler, and sure enough, the yellow rectangles were about .72" down from the dotted line. I'm asking the hivemind here . . . am I correct in my assumption that I need to trim off the top of the decal at this point? Why was it on there to begin with? Is there anything I need to know about this decal? |
Hmmm...
How much off is the entire length of the decal (top to bottom that is) compared to the exposed length of your SM (the top tube of the model where the chutes eject)? That top silver band on the decal is not really necessary from a complete scale standpoint, but maybe that 'extra' area was added to give some trimable 'latittude' for variations in how much SM tube sticks up above the tapered Spacecraft/Lunar Module Adapter (SLA). I'd probably measure the SM tube and then trim as much as needed off that top silver band to allow the decal to fit with no 'extra' decal left at the top. Does that help? Earl |
I think you're on the right track.
I looked at a bunch of pictures of real-life service modules, and there's hardly any gap between the white rectangles and the front end of the service module. So Excalibur seems to have included some "slack." It's an awful lot of it! Makes me feel better about the job I did. With the section above the dotted line removed, my model's service module is maybe 3/32" too short. So I'll need to trim a little off the bottom of the decal as well. The photos also suggested why the narrow white rectangles (one visioble in the photo, below the American flag). There's a half-oval antenna in roughly one of these locations. Similar to the "Scimitar antenna" on the Command Module. I will look into cutting out two more and fitting them to the SM after the decal is in place. I also need to paint the thrusters silver rather than white! Or two tones of metallic. It's funny, going to these lenghts after the awful mess I made of the model as a whole. Perhaps if the SM / CM look good, it will draw people's eye's away from how I glued the wraps on wrong (45 years ago!) and my goofy hand-paint-job. |
2 Attachment(s)
Interesting! I never noticed that. I just applied the decal without looking. By the way, it's Excelsior, not Excalibur. Consider yourself lucky to have gotten one of Gordy's decals. I got mine a few weeks before his printers started acting up. Not available now.
Below is a detailed pic of the CSM from Apollo 15. The vertical dotted line is on the actual module. And a pic of my decal on a Sat 1B clone, less the quad thrusters. Applied five years ago, maybe I'll finish it up by the Apollo 11 anniversary next month. Or not. Cheers. |
I have a few sets of these wraps in 1/70 and 1/100 that hopefully I will use someday....
|
There were some variations between SM's but I wasn't sure what they were so I found a pic or two of the actual Apollo 7 CSM. Since the Estes Saturn 1B kit came out before Skylab and ASTP, I'm sure Apollo 1 or 7 is what it was scaled from. The gold colored parts are your white rectangles. I'm still looking for a good Apollo 1 shot with the block 1 CSM, which I know is different from the decal set you are using.
High Res black & white: https://history.nasa.gov/afj/ap07fj.../68-H-716HR.jpg  |
AS-204 (Apollo 1) CSM. Definitely different. The K-29 came out in the 1967 catalog which means it was modeled after Apollo 1. I don't know if the instructions were modified for later models. I am assuming the instructions were to paint the whole SM silver like the K-36 Saturn V.
Edit: I looked at JimZ's. It seems it was modeled after SA-201 (unmanned) going by the introduction date and the SA-201 photo in the instructions, but decals were modified as the years went by. The decal set on JimZ's shows SA-207, which was Skylab 3. 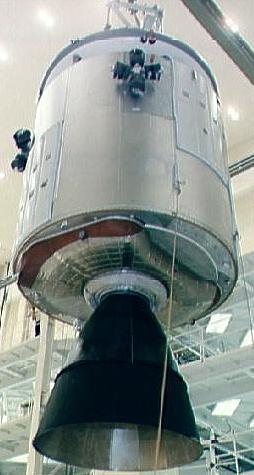 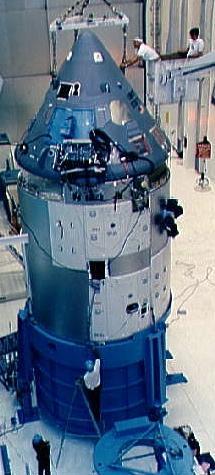 |
Interesting! I hadn't thought of the variations in the SM.
Maybe I should save the Excelsior decal for my Apogee 1/70th Saturn V . . . assuming it doesn't have a decal of its own! It would certainly save time to just paint the 1b's SM silver. My next big challenge is finding the replacement Saturn 1b decals I THINK I bought many years ago. I still have the Estes originals from 1974, but I doubt they'd survive contact with water. |
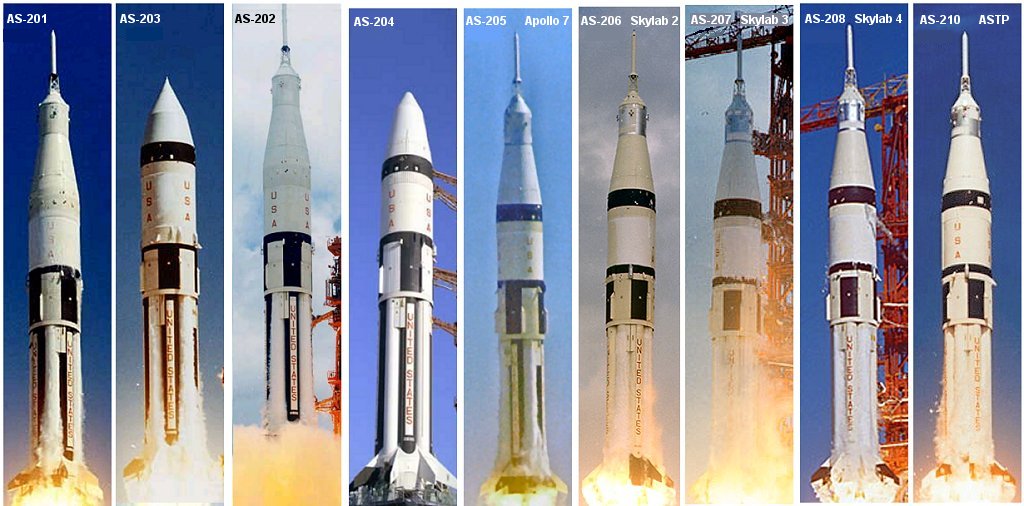
If the decals at the base of the black tanks are SA-201, 202 or SA-204 they would need a Block 1 SM decal. The SA-204 was Apollo 1 and the booster was saved and later used to loft the LM in an unmanned launch with no CSM. Anything higher than 204 would have had the Block 2 CSM and would fit with your wrap. SA-205 was Apollo 7 (Centuri kit was modeled on it), 206-210 were for Skylab and ASTP flights.
Edit I can't find any pics of original Estes 1/70 Saturn 1B decals. The 1/100 used the same SA-205 decal that it did when it was a Centuri kit. I believe the SA-207 decals I saw with the JimZ Estes plans were from the SEMROC kit. |
Yes, with the variations there were with the SM, it comes down to which historical range of vehicles you want to model.
As tbzep pointed out, I think the original vehicle that the Estes model was scaled from was SA-201, launched in early 1966. It had a solid white SM and had no black band around the Instrument Unit (the area at the base of the Spacecraf/Lunar Module Adapter). Here's a photo link: https://en.m.wikipedia.org/wiki/File:AS-201_launch.jpg So, if you want to model that one, your SM is already done! Or, you can go for modeling the later manned flights (Apollo 7 onward) and use your decal. Or go more basic and just paint the entire SM silver. Good thing is, you have choices which gives some flexibility. Earl |
Thanks, excellent input!
My original decal sez SA-207, so I'll be using the Excelsior wrap! I re-brushed the black details this morning. I think I'll use 1/16" black pinstripe to border the black areas. I'm not a steady hand for fine brushwork. |
1 Attachment(s)
Quote:
Well, I found something interesting about the Estes decals with the original 'Uprated Saturn 1' kit. I have an original kit (shipment box post marked September 6, 1968) and the decals (and instruction sheet!) show SA-207 as the mission number! A scan of the decal is attached. I looked too at the original instruction page in the kit for placement of the decals, and where the mission decal goes at the bottom of the black tanks on the first stage, the instructions show, in fine print, "SA-207". Again, these are original instruction pages as came with the kit when introduced in 1967. So...it would seem that from the first releases of Estes kit, they were denoting a 'future mission' of some type. It would appear then that the decals on JimZ site are, in fact, the ones from the original kit. I have a later, but functionally the same, Estes 'Saturn 1b' kit, but the decals are still sealed in their parts pack and I don't really want to open them. Stefanj, what mission is denoted on your 1974 decal sheet? Is it also SA-207? Earl |
I looked more at the instructions on JimZ's. The photos show a completed model painted like the SA-201 vehicle with white SM and white corrugated section at the top of the 2nd stage. However, the Estes logo is the more modern version that was used in the 1970 and newer catalogs and has the Subsidiary of Damon nomenclature. The 1969 kit should have an earlier Estes logo and shouldn't have the Damon name on it unless the kit was released after Estes was sold and the company had time to change the logos on the literature/plans. That makes me think that an original kit sold in 1969 may have had different decals and the SA-207 was a revision in both the plans and decals.
After several minutes searching, I found that SA-207 was originally intended to test the LM, but was canceled in 1967 after the Apollo 1 fire. Estes could have set that mission in stone guessing it might fly about the time model was released. OR...the original 1969 release may have been the SA-201 and the plans and decals were revised. Hmmmm..... I bet Carl researched and knew all this when he released his repro of the kit. :cool: From Astronautics: 1967 August - . Apollo 207 (cancelled) - . Crew: McDivitt, Schweickart, Scott. Backup Crew: Cernan, Stafford, Young. Payload: CSM-101. Nation: USA. Program: Apollo. Flight: Apollo 207. Spacecraft: Apollo CSM. Before the Apollo 1 fire, it was planned that McDivitt's crew would conduct the Apollo D mission - a first manned test in earth orbit of the Lunar Module. Separate Saturn IB launches would put Apollo Block II CSM 101 / AS-207 and Lunar Module LM-2 / AS-208 into earth orbit. The crew would then rendezvous and dock with the lunar module and put it through its paces. After the fire, it was decided to launch the mission on a single Saturn V as Apollo 9. |
BTW, the SA-207 Skylab 3 flight had all white tanks, no black ones.
 |
Quote:
The Apollo 207 cancelled mission may in fact be what they were aiming for with the original decals, which I think the ones I posted are original. That shipment box that contained the kit (the postmark is on the kit box itself) is dated September, 1968, which predates, as I know you probably know, the merger with Damon. I think the instructions and decals are from the original 'Uprated Saturn 1' kit, as originally issued. Now, since the kit came out originally in 1967, I guess there *could* have been some revisions between then an the 1968 kit I have, but I would tend to think not. If some really old timers have clarifying info, please let us know, but I think the "207" designation is probably from the original issue of the kit. Earl |
Yes, SA-207!
|
The 1967 and 1968 catalog model shows the SA-201 paint scheme and does not have the SA-20x decal under the UNITED STATES decal. The 1969 catalog model is painted in the SA-205 scheme and does have the SA-20x decal. That still makes me think there was an update at some point. This is an interesting bit of history, one way or the other. :)
 |
Yeah, that is interesting.
And what makes it so hard to know one way or the other on some of these historical 'model rocketry' details is that a fair number of catalog models, at least in the first year of issue, tend to feature prototypes of models that are close, but not exactly, like the eventual kits offered for sale. If one looks at the Centuri Saturn V and 1b in their 1969 catalog, one can tell that the models seen in those photos are more than likely the prototypes developed before the actual kits were manufacured (the corregations, display exhaust nozzles, etc., all have a little bit different look than what you see in the 1971, 72, etc. catalogs). So, it can be hard to know based on the catalog photos alone. Unfortunately, barring someone at Estes who designed them (I know Bill See did the Estes Saturn V, but I forget who did the 1/70th 1b....someone here knows for sure) who could chime in, we may never know for sure. But yes, you are right: it makes for fun research to try to figure out these little details! If someone knows for sure if the decals for the very first 1967 kits was different, please chime in. Earl |
Gene Street designed it. Thanks again to Carl for the info and to eRockets for keeping the old SEMROC site up.
|
Well, I'm going to pretend that this is the Apollo 7 flight, and use the wrap decal! Since I have them, I'll use the scimitar antenna on the SM as well.
I checked through multiple boxes for the replacement decal I thought I'd ordered, but couldn't find it. It looks like Semroc still has the decals for their version on sale, so I'm in luck. Does the original decal sheet have any collector value? * * * I have flown this rocket "naked" (just white paint) twice. 4 x B6-4, and 4 x C6-5. The latter was pretty spectacular! If the field where the July 20th event is held is big enough, I'll repeat that configuration. I suppose it is possible to use 2 x B6-6 and 2 x C6-5, taking care to arrange them properly. * * * I see other differences in the later Saturn 1b markings. Lots of fodder there for scale builders who want something unique to pursue! |
I've been photo-documenting my build on Twitter.
Mentioned Owen Garriot and Richard Garriot, and the latter replied: "Speaking of which, I need a 1:72 scale Saturn 1B of SL3..." I guess the closest he'll find is the Apogee model. Just needs a new paint job and decals, right? |
Quote:
My son built his SEMROC version with a removable mount. It's flown on single D12-3's, 4 B6's, and 3 C6's. We didn't fly on 4 C6's because of our limited recovery area. You know the chances of landing in a tree grows exponentially with the amount of time spent building and finishing a model! IIRC, it flew great on our combination of 2 B6-2's and 2B-64's. The delay was about right and you didn't have four charges kicking the crap out of the NC. Three C6-3's were about perfect also. It might go a little long on the B6/C6-5 combo. (His was a little heavy with the removable mount and plenty of priming and sanding to get a slick finish.) |
Interesting about spacing out the delays. The second burst might be good for shoving out any balky chutes.
Maybe 2 x C6-5, 2 x C6-6 might be good for mine. * * * I ordered the last set of Semroc decals, and a triplet of Apollo style parachutes, from eRockets. I should have the painting done by the time they arrive. I plan on using white and black pin-stripe tape to border the areas I hand-painted w/o masking. My remaining worry is the masking on the black tanks. I have nightmares of the tape tearing off the white paint underneath, or the border being leaky. Fingers crossed! If all goes well, and it returns from its flight, this might be the first rockets I built a display stand for and put in my living room. |
Nobody has made a 18mm C6-6 since Cox discontinued that motor in like 1972.
|
Quote:
I think that was a typo and he meant B6-6. |
2 Attachment(s)
I actually meant C6-7, but B6-6 is an option!
I found something interesting on the original KD-29 decal sheet. (Included in the kit purchased in December 1974.) In the lower right corner, below the KD-29, is what looks like hand writing: 67F2GA or possibly G7F26A . . . the writing is small and the 6s could be Gs or vice-versa. Could this be a date code? Does anyone have an image of an earlier or later whole decal sheet? Conceivably, this could be a date code, or version number. * * * My painting is coming along. After some touch-up along the margins, I'm done. Then: Decals Paint antenna silver Glue on the antenna panels. Glue on SM attitude jets and umbilical. Matte coating In parallel, I need to paint the escape tower. I'll probably use sharpies to put in some of the "launch configuration" capsule detail, as shown in the Semroc version instruction sheet. |
Quote:
Yeah, that's the same code on the decals from my 1968 kit (scan posted in this thread yesterday afternoon). The first two characters are 67, which I assume come from the year of their original manufacture which would be 1967. Looks like the code stayed the same between 67 and 74. Earl |
2 Attachment(s)
I pencilled in the "launch mode" CM details, and inked them with a pen that wasn't as permanent as I'd like; some of it rubbed off. I may try to paint in the larger details.
Painted the attitude jet bodies and umbilical with a mix of silver and gunmetal, and the nozzles silver. Antennas, silver. It wasn't too clear from the Semroc directions how the umbilical should be placed, The photo on the first page of this thread seems to suggest it is in line with one of the SM attitude jets. |
Comrade:
Just so you know, the antenna are yellow and the umbilical is more or less opposite from the hatch. Call it a 175 degree clockwise rotation when viewed from above. It was, as you noted, slighly offset from the thruster. Here's the link to the Apollo Archive: http://www.apolloarchive.com/apollo_archive.html I hope all of us build or launch something Apollo in the coming weeks and post some pictures. |
Argh! The kit directions got so many little things wrong. If they were put together in 1967 I guess they had an excuse.
It will be hard to paint over the silver with yellow at this point. I could try on one and see if there's show-through. It's easier to wipe off the pen work on the CM, so I can orient the hatch opposite the umbilical, but I wonder what else they got wrong. * * * I "found" my copy of Rockets of the World. It nicely shows how to orient the SM decal and umbilical. |
Quote:
The all-white tanks on the Saturn IB were a change made on the Skylab IB's... On the older Saturn I's and IB's, the oxygen tanks on the first stage were white, and the kerosene tanks black. It was discovered that the black tanks absorbed a lot more solar heating and then re-radiated that heat onto the adjoining oxygen tanks, causing more boiloff of the liquid oxygen. Switching to all-white tanks meant the solar heating was reflected instead of absorbed, thus lowering the heat re-radiated onto the oxygen tanks, thus lowering boiloff. Plus, it was simpler to just paint them all the same color and be done with it. Later! OL J R :) |
| All times are GMT -5. The time now is 02:06 PM. |
Powered by: vBulletin Version 3.0.7
Copyright ©2000 - 2024, Jelsoft Enterprises Ltd.