
|
3D Printed Launch Stand
This launch stand replicates the legs and base plate of the LIA-77 stand, first appearing in the 1962 Centuri catalog. That stand was, of course, made of wood with a Masonite top plate; my top plate has the same layout but is substantially thicker since Masonite is a pretty tough material.
The double-disk rod holder design is based generally on the much later “Power Tower” plastic launch stand, first appearing apparently in the 1974 Centuri Rocket Times newsletter. The later 1975 catalog indicates it was “formerly LIA-66” but I have not found a scan of any catalog where it was listed that way. Regardless, the discs between the floating jaws of the rod holder are notched to accept either 1/8" or 3/16" rods, just as with the “Power Tower,” but they also have tabs to prevent them from rotating freely when the rod is removed. You'll need to print one A and one B disc, not two of the same one, or the notches won't line up properly. The rod clamp bolt and the leg assembly bolts are all ¼" carriage bolts; the legs need three 2" long bolts and three 2¼" long bolts. I couldn't get 2¼" bolts, so the longer ones in the photo are 2½" which works fine but the shorter ones would look better. The rod clamp bolt is 1½" but could be a bit shorter and would still work fine. The bolt attachment points are all relieved for both carriage bolts (square holes) and flat head (countersunk) screws. Of course, carriage bolts are easier to work with since you don't need any tools, where you'll need a screwdriver for the flat heads. You could assemble the stand using wingnuts and avoid printing any of the knobs shown, but I chose to go with the knobs as I could print them out of bright colored PLA and then not lose them in the grass if I dropped them. I did use a washer under the clamp knob to make it turn more smoothly. Other than that, the listed seven bolts and enough ¼" nuts to match is all you'll need to assemble it (plus a launch rod and blast deflector, of course). Use a bolt to pull the nuts into the knobs, as they are just snug enough to need some help. The floating jaws fit the spindle bolt rather snugly; you may need to sand or file the edges a bit before assembly. The spindle bolt itself is designed to be printed upside down (as distributed) with no supports… it's designed to use bridging to fill in the unsupported spans in the T-slots. My rod in the photo is fitted with a machine screw to support a ceramic blast deflector, but I left it off for the picture so the mechanism wouldn't be hidden. 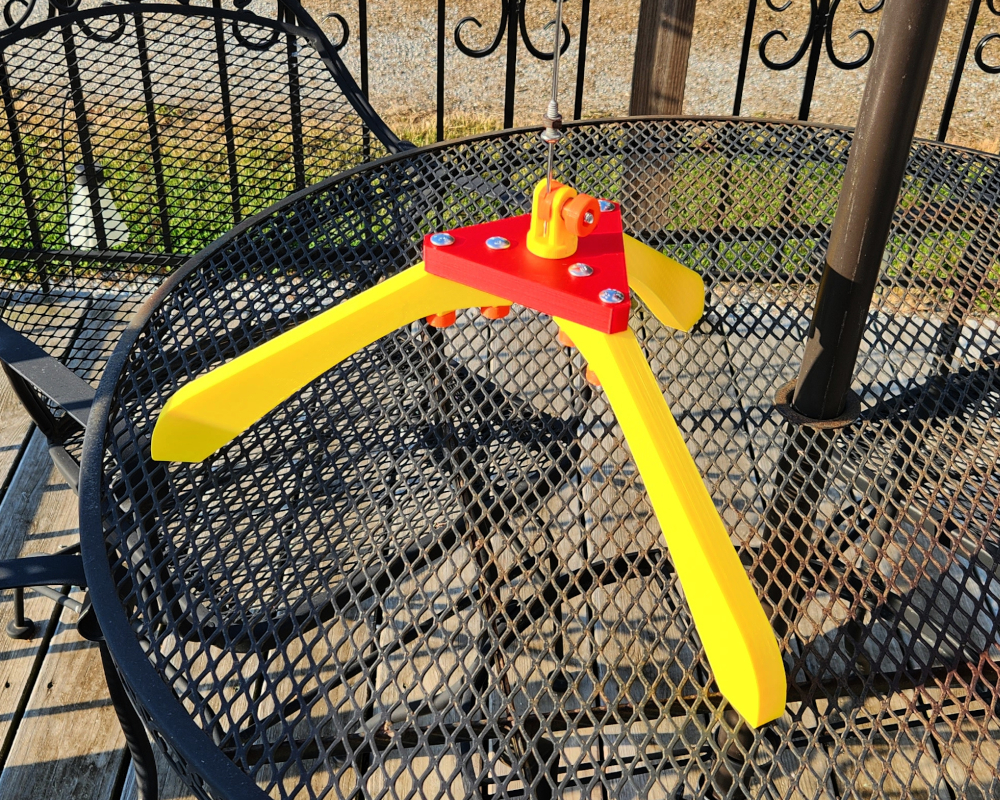 Files are available here: https://www.printables.com/model/48...et-launch-stand |
That looks utterly adorable! Like something from an alternate 1970s where the LIA tripods went plastic.
|
:cool: I feel like I should transport it to the field in my Little Tykes car.
|
Heh. It would look better in black, I'm sure. I chose bright colors for everything so I couldn't lose the parts in the grass.
Prusament PLA in Prusa Orange, Lipstick Red, and Pineapple Yellow. 0.6 nozzle, 0.2 layer height for the large parts, 0.12 to 0.15 for the smaller ones (didn't make a lot of difference). |
Quote:
No, it looks great. The Little Tykes car was the first thing that came to mind. I spent a lot of time pushing those around the neighborhood. |
Nice work. Replacing the wing nuts with knobs was a great idea.
|
Thanks guys.
So, retro launch stand. Check. Next: not-retro launch controller that uses Black & Decker Lithium drill batteries... |
Quote:
That is pretty lively looking and a good reproduction! How much does it weigh all said and done? The Centuri 'Powr Tower' you referenced is the Estes Porta-Pad, rebranded with Centuri metallic decals. Other than the decals and the much better Centuri angled deflector from the Servo-Launcher and the Powr-Pad, it is pretty much an exact carry over of the Estes pad. By this time in '74, Estes and Centuri had begun sharing some parts and the Centuri re-use of the Porta Pad as their Powr Tower may have been one of the first examples of this. With this 'new' launch pad, Centuri had dropped both the wooden tripod launchers, the LIA-77 which you have so well modeled, and the larger LIA-100, though Centuir's 'annoucement' of the new Powr Tower only referenced at the time that it was replacing the LIA-100. But, both the wooden towers were essentially gone then. Also, around early '75 Centuri made the move from their long-standing alpha-numberic catalog numbers (e.g., LIA-66) to four digit catalog numbers to facilitate computerizing inventory, probably in conjuciton with Estes at that same time. Earl |
Quote:
I honestly don't know. It's pretty light. 45% infill for strength, but that still doesn't amount to much. Quote:
Never owned the Estes Porta-Pad, so I didn't know for sure if they were the same. But the only thing I "borrowed" from that design was the double grooved disc rod holder. Quote:
I find it curious that they had the "Powr Pad" (intentionally misspelled) and the "Power Tower" (spelled correctly). The earliest appearance of the latter I could find was in the 1974 Rocket Times, where the Power Tower was listed with a part number of 3610 and did not mention "LIA-66" at all. (They also had the "Powr Control" launch controller, again spelled incorrectly on purpose.) I notice the Power Tower was listed the same in the January 1975 Rocket Times, but then in the 1975 catalog it's listed as "PROD. NO. 3610 (Formerly LIA-66)." As I stated before, I can't find any evidence of this stand being sold as part number LIA-66. Weird. Quote:
This I was aware of. I've spent quite a bit of time reading the old catalogs. I got into rocketry in 1976, but Ninfinger's site is an excellent reference for the earlier stuff. |
That is neat. My only nit is that 1/4 inch bolts are way overkill. The wooden ones used, I think, #8 or possibly #10 screws. But I don't quickly find smaller-than-1/4 inch carriage bolts anyway.
The first version of the Estes Porta-Pad and the Power Tower have identical (and interchangeable) plastic parts. That launch rod holder lives on pretty much to this day in the Porta-Pad II that Estes still makes and includes in launch and starter sets. I have been looking for a way to attach those rod holders to PVC-pipe-based launch pads, especially my 3-pad rack, to use in lieu of the two-eyebolt swivel and a rod holder made from a 1/4-20 coupling nut and 10-32 thumbscrew (crude imitation of the Odd'l Rockets Adeptor). Your implementation looks like it could be the basis for doing that without having to steal parts from the oversupply of Porta-Pad Its at my house. Now all I need is a 3D printer.... Thanks for sharing. |
| All times are GMT -5. The time now is 04:49 AM. |
Powered by: vBulletin Version 3.0.7
Copyright ©2000 - 2024, Jelsoft Enterprises Ltd.