
|
|
|||||||
 |
|
|
Thread Tools | Search this Thread | Display Modes |
|
#1
 05-16-2013, 02:46 PM
|
||||
|
||||
|
One of those rockets that held my attention when I was a kid was the Optima. Big, beautiful, and IMHO underpowered. I didn't have enough money to ever buy one (or two), but I sure love those lines. Well, with all the spare BT-60 I had, I decided that it was time I get myself an Optima (or two), just a smidge smaller than the original.
So, I'm downscaling the Estes Optima rocket (63%) and building two of them. One in the white nose-to-seam/black seam-to-rear paint scheme, and one in the black, white, and yellow schemes. For whatever reason though, I'm not in love with the black/silver/blue version of this rocket known as "The Shadow".  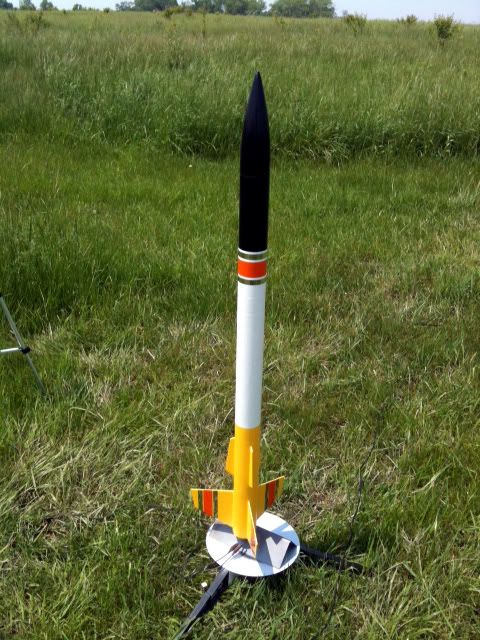 Bill Eichelberger's? Black and White Optima, and Landshark's Black, White, and Yellow Optima Clone Since the downscaled body tube came out to be longer than 18" I decided to make things simple for myself and downscaled the lengths of the originals to keep the seams in the same relative location... Except that I was able to combine the upper tube with one of the two lower body tubes into one single body tube since the combined length was less than 18". This was because the joint between the two lower tubes is the common separation point for most of the paint schemes, and I felt that masking may be easier this way. Overall Length Original 47 1/2" (47.5") Downscale 29 15/16" (29.925") (63%) Nosecone Original 8 3/16” (8.125”) Ogive Downscale 5 1/8" (5.125") Ogive (nearest match to the actual number 5.11875") Original Body Tube Outer Diameter 2.6" (BT-80) Length 39 3/8” (39.375") Upper 11” For a true downscale with 3 sections for the body Outer Diameter 1.64" (BT-60) Length 24 13/16” (24.80625”) Upper 6 15/16” (6.93”) (11" equivalent) Yellow Tail Downscale Body Tube Dimensions For the yellow tailed rocket, I know that the yellow extends from the seam of the center/bottom tubes down to the rear of the rocket (as it appears in the instructions found on JimZ's website). However, Estes instructions don't say how far down does the black extend (from the joint with the nosecone). It didn't look like the rocket's paint job was divided into 3 equal lengths of color (and the body tube lengths carry that out). I also had checked Semroc's Optima, but mini-version didn't have a ratio that looked to me to be the same. Eventually I was able to contact Landshark, and he gave me the dimensions that he used. Landshark's paint job Black overall 14 7/8" (14.875") Nose Cone 8 3/16” (8.125”)White 18 3/8" (18.375") Yellow 14 1/4" (14.25") Landshark's paint job downscaled Black overall 9 3/8" (9.37125") Nose Cone 5 1/8" (5.125")White 11 9/16" (11.57625") Yellow 8 15/16" (8.9775") Outer Diameter 1.64" (BT-60)Black Tail Downscale Body Tube Dimensions The black tailed rocket has a white section 15 7/8" long. So, rather than risking having a seam in it, I opted to make the split at the color division. This makes the back (and black) section 8 15/16" long. The black tailed rocket will have a traditional Estes like recovery system. Outer Diameter 1.64" (BT-60) For the nosecone, I'm planning on using Semroc's BNC-60V (5.25" Ogive) I'm currently using the (non-Big Bertha) nosecones found in the Estes NC-60A pack as place holders. I've yet to run the mod though OpenRocket, so I don't know how much (if any weight) will be needed to make the rocket stable. For engines, I'm planning on 24mm engines (C-11/D/E). The rockets will get 1/2 moon baffles to protect the parachute. I'm planning on 3/32" thick fins, because that is close to scale accurate, and (once papered) plenty strong. I've become a big fan of through the wall fins, so both front and back are going to get that treatment. I've got some scrap mylar from my Mercury Atlas(s) for the silver decals. I have some retro-reflective vinyl film for the band of color (I'll be using red rather than orange (it'll save me $15.00 USD). An added advantage to retro-reflective film... If it gets hung up in an orchard (it's happened to me before (see my signature file over on TRF.) I can use a light to help me find it after dark. The black tailed rocket's body tubes have already been glued together. I'm holding off on the yellow tailed rocket's glue-up so I can take photos. Since I'm out of thick wall BT-55, and lacking the centering rings, this build will be on a short hold until I can get the scratch to buy the needed parts. More Later Jim .
__________________
. . Dreaming of making the rockets I dreamed of as a kid (and then some). "The Guide says there is an art to flying", said Ford, "or rather a knack." "The knack lies in learning how to throw yourself at the ground and miss." Launching is Optional... Landing? That Depends on Trees. Last edited by K'Tesh : 02-02-2017 at 04:59 AM. 
|
|
#2
06-01-2013, 07:55 PM
|
||||
|
||||
|
Well, I completed major assembly on one of the Optima's this afternoon.
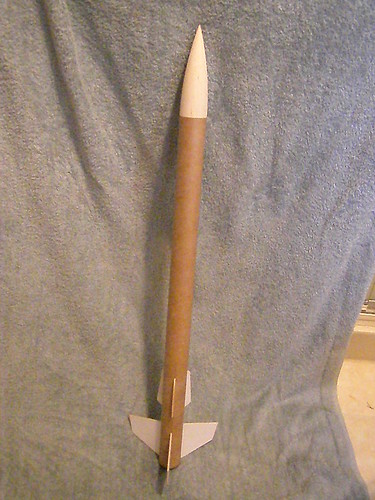 I was stalled due to a lack of engine mounts for it, and now that my Semroc order arrived, I was able to build the engine mounts. I cut and papered them and glued them on earlier today. Each of the main fins were made from one piece of 3/32" thick balsa (unlike the original which was 63% larger and made in 2 parts glued together (as well as presumably made from 1/8" thick balsa)). I slotted the tube for them. The dorsal fins are not slotted however. 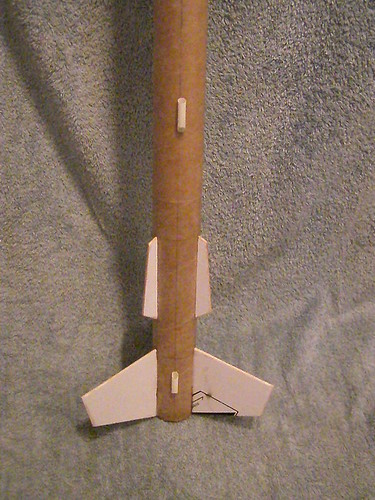 My recycled printer paper did manage to annoy me, I didn't see the fin printed on the paper before I glued it into place. On to filling spirals, fillets, and other finishing proceedures.
__________________
. . Dreaming of making the rockets I dreamed of as a kid (and then some). "The Guide says there is an art to flying", said Ford, "or rather a knack." "The knack lies in learning how to throw yourself at the ground and miss." Launching is Optional... Landing? That Depends on Trees. Last edited by K'Tesh : 06-02-2013 at 01:16 PM.
|
|
#3
06-20-2013, 02:09 AM
|
||||
|
||||
|
I've got one almost ready for primer (still have to fix the fillets), the second needs fins. I managed to dye the black nosecone black with RIT and alcohol. The white one's nosecone has been sealed, but not sanded.
TBC Jim .
__________________
. . Dreaming of making the rockets I dreamed of as a kid (and then some). "The Guide says there is an art to flying", said Ford, "or rather a knack." "The knack lies in learning how to throw yourself at the ground and miss." Launching is Optional... Landing? That Depends on Trees.
|
|
#4
07-26-2013, 11:09 AM
|
||||
|
||||
|
These rockets stalled because of my failure to get the look I desired with the Elmer's wood filler. After applying it to a single fin, I felt that this was not the material I wanted to use to fillet this rocket.
I went out and primed it, and after examining it, decided that I should give epoxy a try. Once I had my first fillet down, I knew that if the material didn't bubble, or something go horribly wrong, I had my new fillet material. The results were stunning (I'll only use Epoxy from now on). Some sanding, some more primer (I had that joint in the body tube to deal with) and more sanding, I've finally primed the first Optima with its base coat of white. This will be the black bottomed rocket, and I'm ready to lay the first color coat down. The 2nd Optima stalled out when I got to doing the fins due to my fillet issues. It's now moving up the que again. I'm not 100% happy with the nose cone, it looks too pointed (not a comment on the quality, but my choice of shape). I wish I knew more about nosecones, and how to get what I want from that custom nose cone generator at Semroc (Carl, I can't figure out how to make a secant ogive). So, I'm hoping that someone will someday design the upscaled/downscaled versions of the old Estes blowmolded plastic nosecones that are truly faithful to the originals. So, now you're up to date... More later Jim .
__________________
. . Dreaming of making the rockets I dreamed of as a kid (and then some). "The Guide says there is an art to flying", said Ford, "or rather a knack." "The knack lies in learning how to throw yourself at the ground and miss." Launching is Optional... Landing? That Depends on Trees.
|
|
| Thread Tools | Search this Thread |
| Display Modes | |
|
|


 Linear Mode

