
|
|
#31
 05-16-2019, 12:50 PM
|
||||
|
||||
|
Quote:
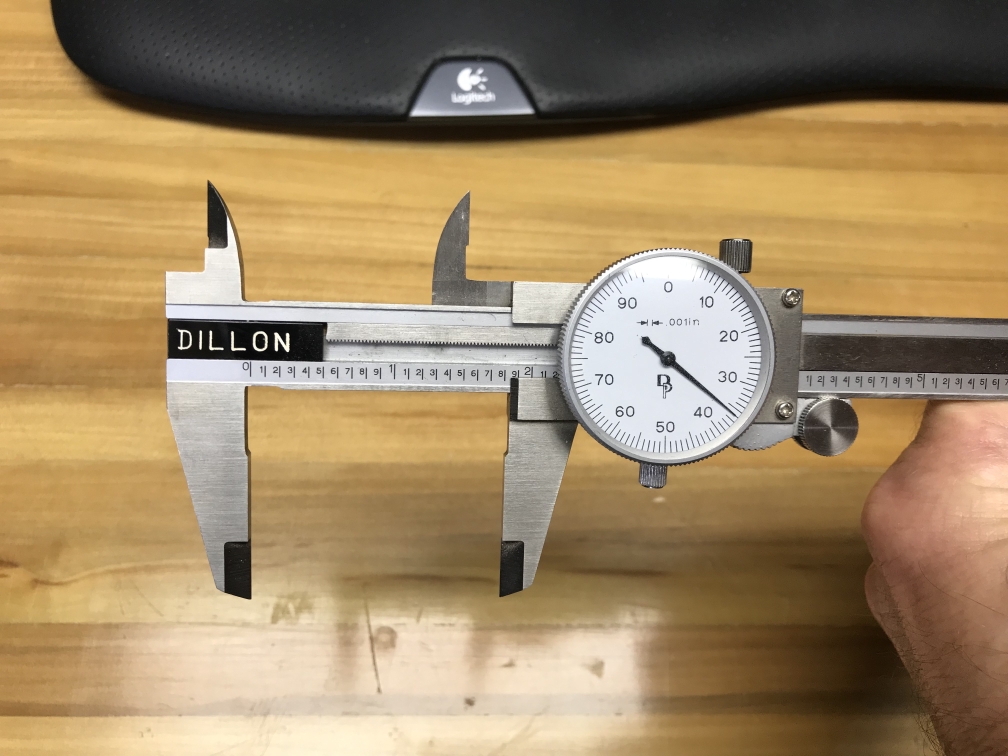
My reloading caliper says 1.836"
__________________
Never trust an atom. They make up everything. 4 out of 3 people struggle with math. Chemically, alcohol IS a solution. NAR# 94042 SAM# 0078 
|
|
#32
05-16-2019, 01:00 PM
|
||||
|
||||
|
You are probably right Jeff!
I didn't get out the caliper.
__________________
Hans "Chris" Michielssen Old/New NAR # 19086 SR www.oddlrockets.com www.modelrocketbuilding.blogspot.com http://www.nar.org/educational-reso...ing-techniques/ Your results may vary "Nose cones roll, be careful with that." Every spaceman needs a ray gun. Look out - I'm the Meister Shyster!
|
|
#35
06-03-2019, 09:34 AM
|
||||
|
||||
|
Although I've never heard of any problems with the SM parachute attachment point, I thought that since the 1969 version comes with a big hunk of plastic to replace a paper shroud, I'd use it for the parachute anchor. I drilled a big hole in the top of the part so I could place a blob of JB Weld on the exposed screw eye threads on the inside. If I had it to do over, I'd go ahead sink the screw eye in as far as it would go (the threads would be completely past the other side of the plastic), since I have the JB Weld holding it from the inside.
 
__________________
Mike Fields
|
|
#36
06-23-2019, 02:36 PM
|
||||
|
||||
|
AT LAST!!
I finally have a little time to work on the SV #1969 build. After cutting out and trimming the 3rd stage reduction wrap I spray it with 3M #88 and apply and join it to the base wrap. The seams came together perfectly. I wish I could say the same for the 3rd stage wrap. As you can see there's approx. .125" of gap. I'll figure it out. TBC
__________________
Never trust an atom. They make up everything. 4 out of 3 people struggle with math. Chemically, alcohol IS a solution. NAR# 94042 SAM# 0078
|
|
#37
06-23-2019, 06:29 PM
|
||||
|
||||
|
Quote:
Jeffy- The Centuri Saturn V wraps would sometimes be short also. The first Saturn V I got back in the day had a couple wraps that had about the same gap. I sanded the backs of the wraps some and also carefully stretched them by holding both ends and tugging them over a hard by smooth, rounded surface (like a table edge or chair back). Sanded some portions of the tubes a little too. All told, it eventually took care of most of the gap, but I think I still had about 1/16 of a gap or a little less on one, but was able to fill it in and it was not noticeable. Some of the 'collector' Centuri Saturn Vs I've picked up since vary from no gaps at all in some kits to kits that have similar gaps. Not sure if it is a case of aged plastic or possible somewhat aged and lightly swollen tubes. It was a little frustrating though for sure. Earl
__________________
Earl L. Cagle, Jr. NAR# 29523 TRA# 962 SAM# 73 Owner/Producer Point 39 Productions Rocket-Brained Since 1970
|
|
#38
06-23-2019, 09:24 PM
|
||||
|
||||
|
Thanks. I was even thinking about softening the wrap with a heat gun and trying to stretch it--but I suppose that has the potential to be disastrous.
TBC
__________________
Never trust an atom. They make up everything. 4 out of 3 people struggle with math. Chemically, alcohol IS a solution. NAR# 94042 SAM# 0078
|
|
#39
07-04-2019, 10:24 PM
|
||||
|
||||
|
I'm back from a job in CT and I have some time to work on the SV.
I also had to shorten the BT a little to match the coverage of the wrap. I've sprayed the wrap with adhesive and laid it on. The gap is as I had expected and I think I have a creative solution for the gap. Stay tuned. TBC
__________________
Never trust an atom. They make up everything. 4 out of 3 people struggle with math. Chemically, alcohol IS a solution. NAR# 94042 SAM# 0078
|
|
#40
07-05-2019, 09:08 AM
|
||||
|
||||
|
Jeffy-
Will be interested in seeing your fix for the gap. Frustrating, I know. I see Estes has included some extra scale 'bits' at the top of the wrap, but wondering why they decided to go with a full body wrap for the S-IVb stage on this version of the kit. I have not purchased this kit yet, so I have not had a chance to look over parts in person. Any particular reason you see Jeffy that would indicate the reason? Earl
__________________
Earl L. Cagle, Jr. NAR# 29523 TRA# 962 SAM# 73 Owner/Producer Point 39 Productions Rocket-Brained Since 1970
|
 |
| Thread Tools | Search this Thread |
| Display Modes | |
|
|


 Linear Mode

