
|
FlisKits Frick -n - Frack Build Thread
1 Attachment(s)
I've been wanting to build something unique and different to entertain my grandaughter at our launches (she likes to watch the rockets launch into the air). I've read several areas on the forum that mentioned the Fick-n-Frack and after seeing a video knew that it was the rocket to build. I haven't seen a build thread (if there is one, I missed it during a forum search) so I decided to start this one.
Below is a picture of the kit. Not much to it except the balsa, couple of motor tubes, a motor block and launch lugs. I'm starting out sanding the balsa in the sheets with 320 grit sandpaper. I think I'm going to use sanding sealer instead of the f n f to try to keep the weight down. After I get past the sanding and into the actual build, I'll post again. For Mr. Jim Flis.....looks like this is going to be a great kit. Thanks for your innovation with rocket designs. You're keeping the hobby interesting! :) |
Wow! Goes Fast!
2 Attachment(s)
This build went really fast. The most time was spent on sealing all six sheets of balsa on both sides.... :eek:
Instructions were straight forward and easy to follow. The fins have a stop built in so that the fins are perfectly aligned with the end of the body tubes. The stop is then just "popped" off after the glue has set. The first picture is one of the sustainer fins being glued to a body tube. The template provided really helps to keep the fins aligned. The second picture is a better shot of the fin template. In the picture is the sustainer with all three fins. The booster fins are attached using the same method. |
Attaching the Aerobrake Plates
2 Attachment(s)
After the glue has dried on the sustainer and booster fins, the aerobrake plates are attached. The sustainer gets the plates installed first. The first picture shows the plates installed on the fins of the sustainer. Again, the template is used to help keep everything aligned properly.
After the glue dries on the plates, you then use an expended motor to mate the booster and sustainer together and attach the plates to the booster fins. The second picture shows them assembled together waiting for the glue to dry. |
Launch lug and motor block
The last couple of steps have you install the launch lugs and the motor block. Like I said, this was a fast, straight forward build. As soon as I get it detailed, I'll post some final pictures before I launch it.
Now, some of the things to keep in mind while building....... The plates are 1/16" balsa and very fragile. Use care when sealing them. Don't get them too wet or they may warp on you. The stop tabs on the fins are easy to pop off. Be careful when freeing the fins from the balsa sheets. And, when glueing them to the body tubes, don't apply to much downward pressure on them or they will pop. There is a total of 24 joints that need to have fillets. I recommend doing them on the sustainer fin/body tube joints first, then the booster fin/body tube joints. Wait for these to dry before applying the fillets to the fin/plate joints. This way you don't have to worry about the glue flowing and making little goblets. I'm really looking forward to seeing this one fly! |
The Frick'n'Frack is a cool flying rocket!:cool: I have flown mine a couple of times in the front yard!:eek:...
Here is how mine turned out-I finished it in Christmas colors.. 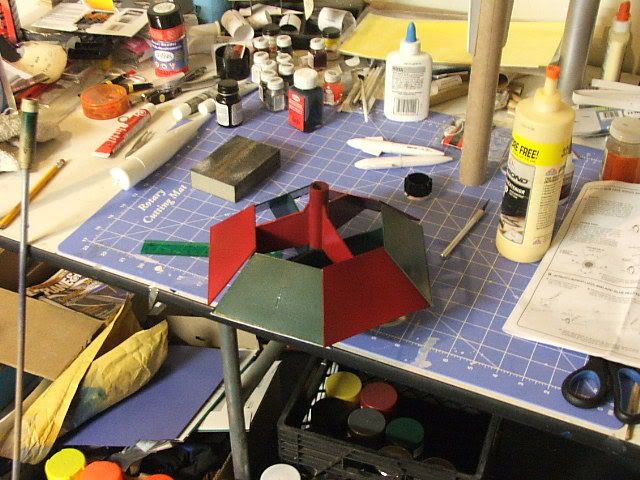 Here is a short video:  |
Yep.....I think that was the video I saw that convinced me to buy one. :D
|
Something different....
1 Attachment(s)
Since I'm making this model more or less for my grandaughter, I decided to put some pictures of her on the aerobrakes. The lower sides of the sustainer are red, the booster will have blue on the lower sides.
Here's a picture of the sustainer with two of the aerobrakes with pictures...... |
This is so kewl :)
I am glad that you are having fun with this kit. And the pix of your daughter are a wonderful addition! We have a club member who did that with his Deuce's Wild! and calls it the "Kids Wild!" :) I can't wait to hear a flight report! I am also glad that the build went well. That model went through several design changes to aid in assembly and those stop tabs were the last change before we went into production. They are the cats meow, I can tell you that LOL Heck, my first FnF was all hand cut, no stop tabs, no locking tabs for the plates, no alignment jig, etc, etc... When I finished it I wondered if something like that could ever be kitted. The flights were rather erratic too as the alignment wasn't as good as I would have liked. Each change lead to an improvement in assembly as well as flight, so it was a great experience designing :) Now, you want some REAL fun!? Find a large group of folks with Frick-n-Fracks and schedule a drag race... We did one with 7 of them and it was the most incredible drag race I ever witnessed! Keep us posted! jim |
4 Attachment(s)
Speaking of the seven way drag race here are some pics. :)
Looking good so far BTW. |
Quote:
Visions of those twisting, whistling fireworks..... :D Looks like they flew pretty straight (well some of them) considering the wind (as guesstimated by the flag). One more picture to pick out and apply and then a coat of Future to protect the pictures from ejecta and this baby will be ready for flight. Unfortunately, grandaughter won't be here till late this coming Sunday (Oct 19) so it looks like I need to schedule a launch for the following Monday after work...... ;) |
| All times are GMT -5. The time now is 07:52 AM. |
Powered by: vBulletin Version 3.0.7
Copyright ©2000 - 2024, Jelsoft Enterprises Ltd.